Hi everyone, today I come to you with the story of a freelancing experience I had, and what I got out of it.
The job
The job is that a business makes appointments through an online service called TimeTap and needs to take client information from this service and print it out onto labels that have a QR code that can be scanned.
So I get to work and make...
AutoTimeTapLabelMaker
It is a terrible name, I know, but it's the best I could come up with at the time. The code is available here.
Let's talk about what the requirements were:
- The user is non-technical and needs an app they can run without any thought - no CLI apps, no matter how nice it feels to type.
- The apps needs to fetch client information from TimeTap.
- The app needs, without user intervention, to print out labels to a DYMO printer for clients making appointments.
There were a few challenges here -- this is a Python project that will interact with a REST API, and ultimately run on Windows.
Interacting with the REST API
I wrote a small API wrapper around TimeTap in Python, which I call timetappy, and I've made it available here.
I don't intend to update this as I don't have any use for TimeTap outside of this project, I only wrote it to wrap some functions I needed.
If you want to see a good example of an API wrapper I wrote, check out ninjarmmpy.
To build timetappy, I just needed to follow the API documentation provided by TimeTap.
Now I can pull client data and work with it.
To store the client data the app is downloading from TimeTap I used the sqlite3 module in Python,
because with this module I can have an in-memory database.
This is important because I want the app to be as easy as possible to use. If the program is closed,
the user does not necessarily need the previously processed clients, they've already been dealt with.
The app downloads fresh information every few seconds and puts it into the SQLite database and
when a client's info is printed the row is marked as such so the app doesn't print it again.
Speaking of printing...
Printing to the DYMO printer
Luckily for me this wasn't so hard, I just needed the package pywin32 so I can access any native Win32 functions I need.
DYMO printers have a special printer driver which registers a COM object in Windows,
and Python can't interact with those out of the box. This is where pywin32 comes in handy.
We can now have access to the COM object and its methods with code that looks like this:
from win32com.client import Dispatch
printer_com = Dispatch('Dymo.DymoAddIn')
Now that I can interact with the DYMO Label Printer, I need to be able to generate QR Codes. DYMO makes software, DYMO Label, which I used to define a basic QR Code label with some placeholder text. With this template, I can manipulate it as needed in code to process each client and print out their labels.
There's one part missing.
GUI
This was the most difficult part of building the app. Creating a GUI app means making sure of the following:
- The GUI should show the user that an action is taking place
- The GUI should be responsive to user input, no matter what the action is
The PySimpleGUI package allows us to easily create a GUI with just code,
and the below snippet shows what I found a bit challenging:
import PySimpleGUI as sg
layout = [
...,
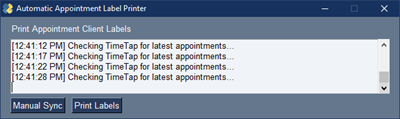
[sg.MLine(size=(80, 5), k='-ML-', reroute_stdout=True, write_only=True, autoscroll=True, auto_refresh=True)],
...,
]This adds a textbox to the layout of my GUI which shows anything that is printed to stdout.
Anything passed to a print function call will show in the multi-line box defined above.
Through out app operation, I print the current step so the user knows what is happening if they look.
Now obviously there are some buttons so that the user can tweak some options such as how many labels to print. If there is a long operation happening however, like a database cleanup, the user might find the GUI is not responsive and think the app isn't working.
To solve this we have to use threading. Each action should have its own thread so the main thread which runs the GUI is never waiting for another function call to finish. This is also important because at this point I realized that I needed to go back to where I instantiated my in-memory database and make it so that different threads can interact with it:
sqlite3.connect(':memory:', check_same_thread=False)By default, sqlite3 will only allow one thread to interact with an in-memory database. Setting check_same_thread to False removes that limitation.
The end result looked similar to this:
What about packaging the application for Windows?
For that, another Python package, pyinstaller! There's a short tutorial on the PyInstaller website.
Using pyinstaller I was able to bundle the Python application into one Win32 executable containing all the dependencies.
Normally someone might write an application using C++, C#, or Java to get something like this done, but it was fairly quick with Python.
Most of the time spent on this project is learning how to use packages like pywin32 and PySimpleGUI.
Conclusion
I hope this helps folks get their feet wet with GUI programming. I've gotten a bit more interested in it, and I'm currently looking into
PySide2 which provides the Qt framework to do even greater things,
so I would recommend that library going forward.
As always, thanks for reading.
-- AJ